Firebase App Distribution with codemagic.yaml
How to deploy an app to Firebase App Distribution using codemagic.yaml
Requirements
For distributing an iOS application to Firebase Console, your application must use a development, Ad Hoc or Enterprise distribution profile.
To authenticate with Firebase, Codemagic requires either a Firebase token or a service account with Firebase App Distribution Admin role, as shown below:
1. Authenticating via service account
Service accounts are useful for setting up App Distribution in a CI environment. Authenticating with a service account allows you to use client libraries (e.g., the Firebase CLI or fastlane) to distribute your builds. When you use a service account to authenticate, Firebase uses Application Default Credentials (ADC) to locate your app’s credentials, which you can provide by setting the GOOGLE_APPLICATION_CREDENTIALS environment variable.
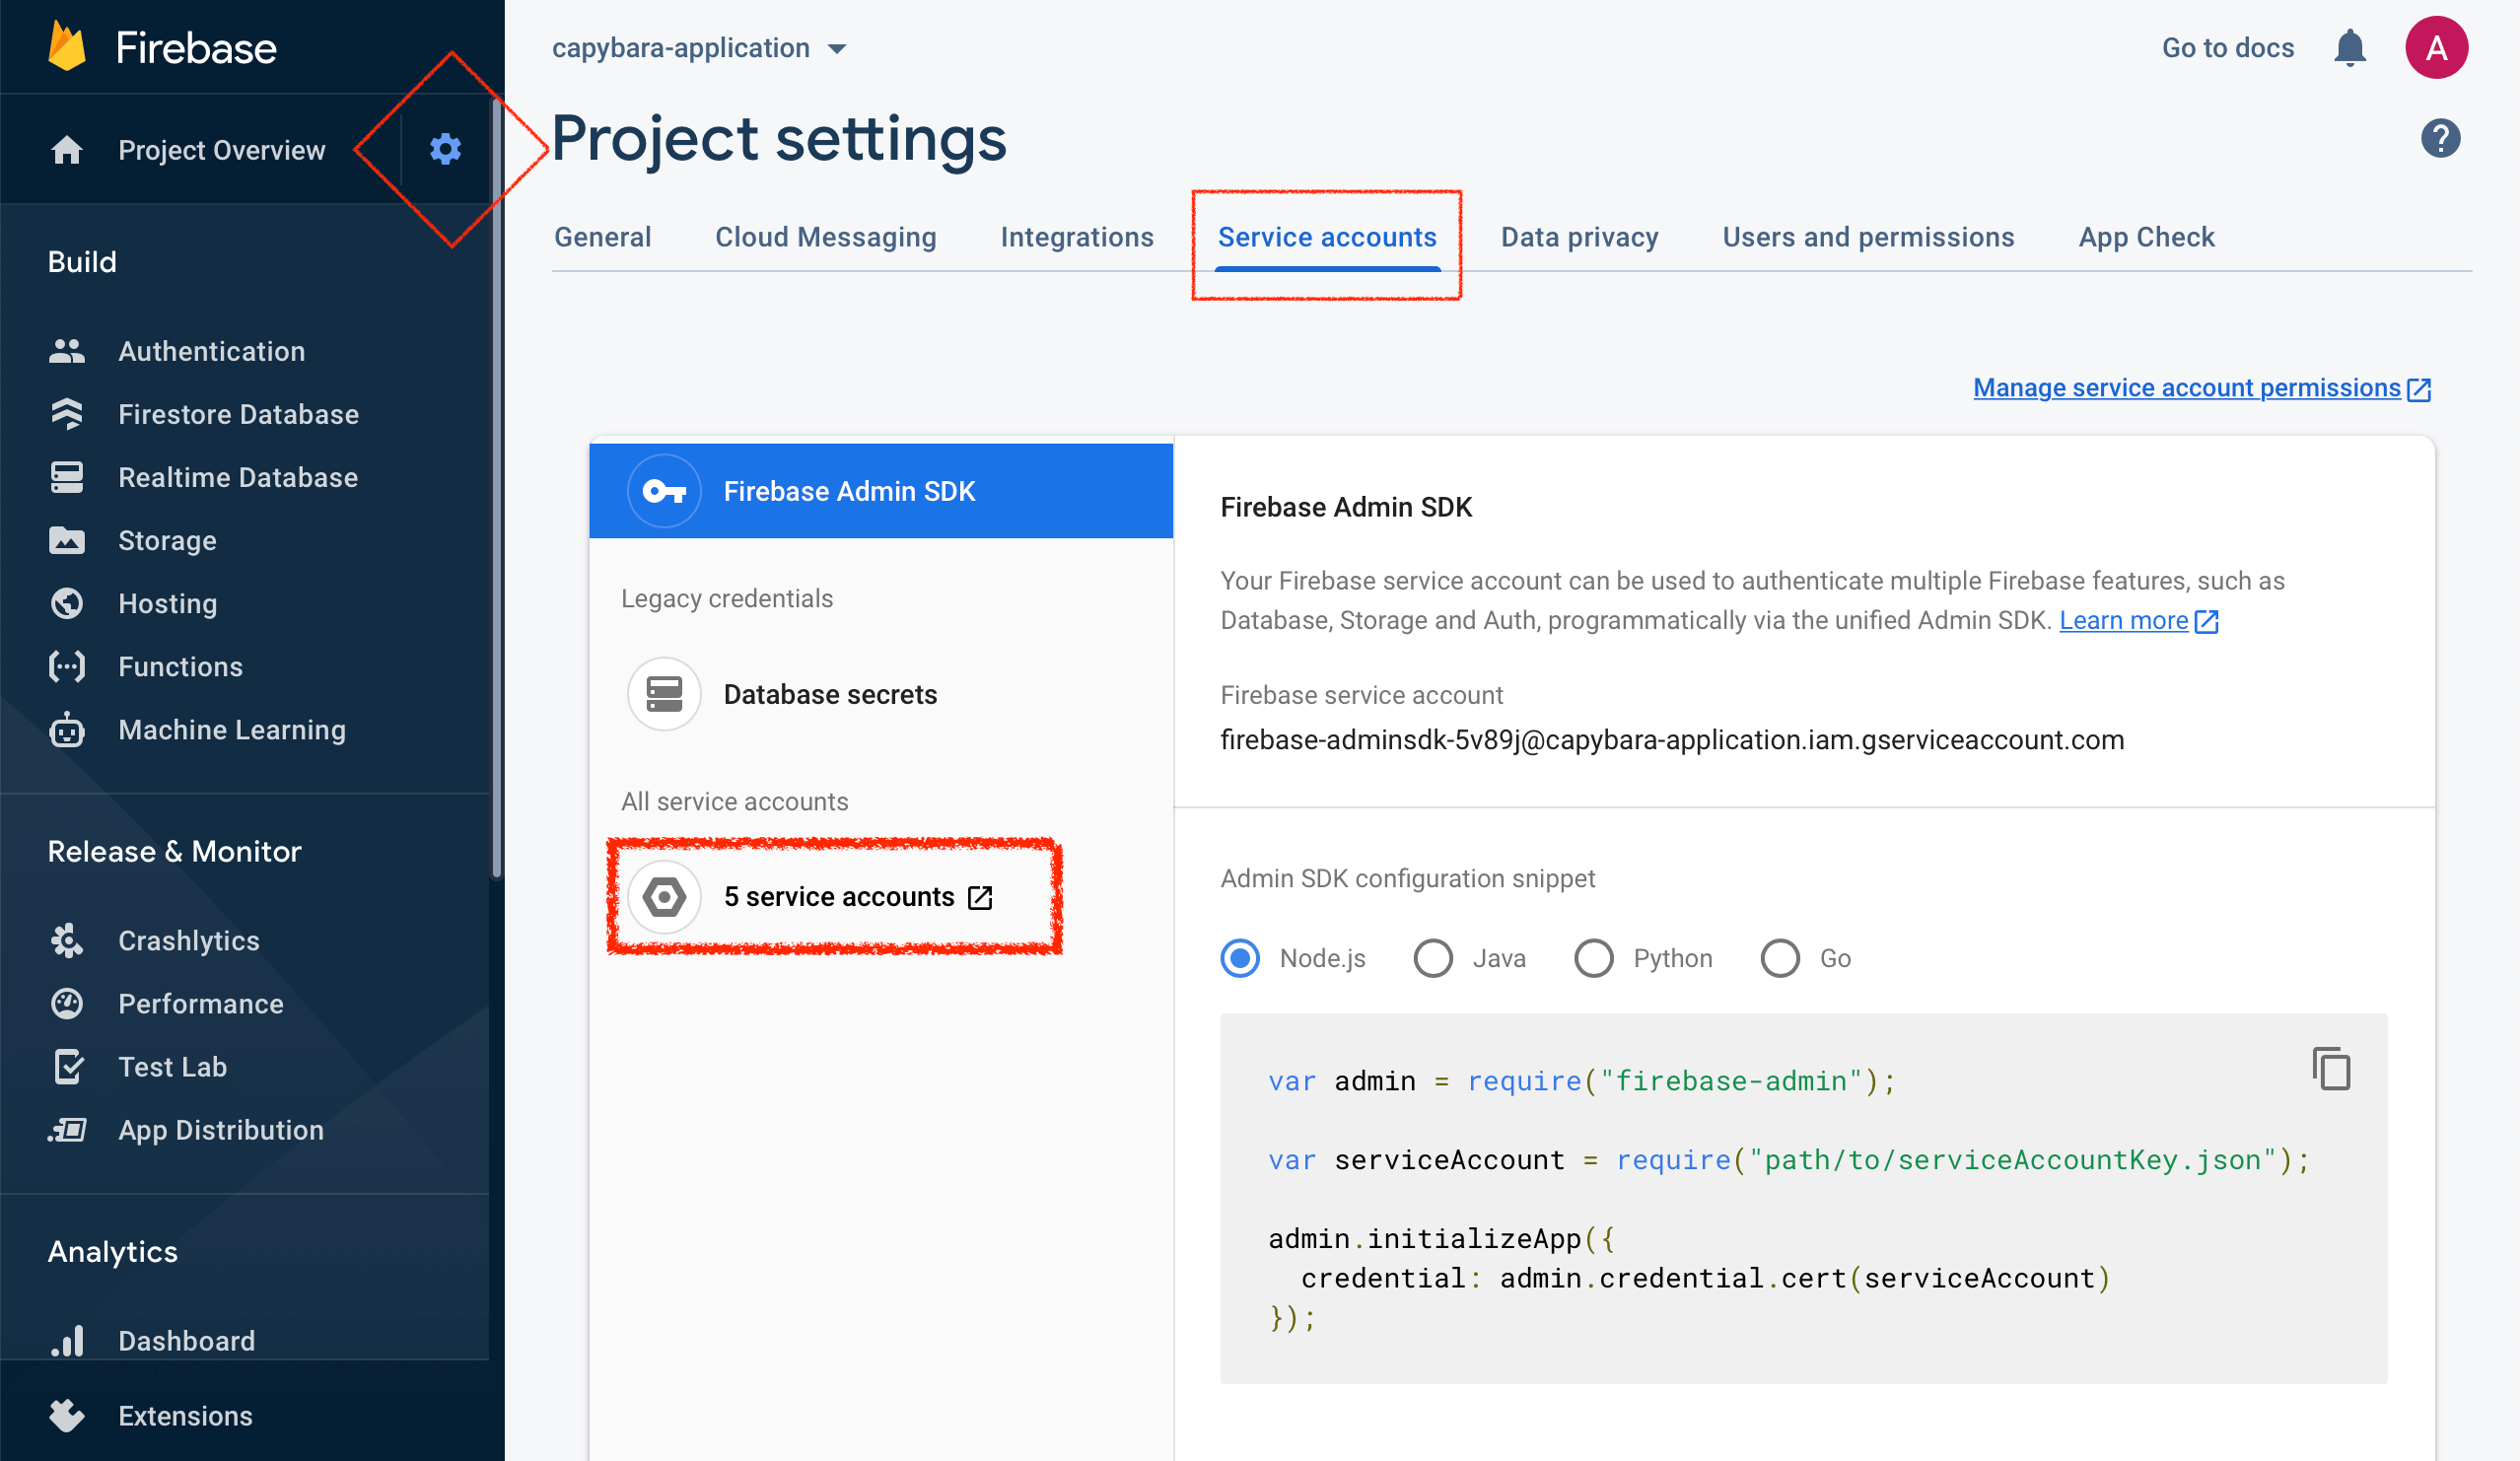
On the Firebase project page, navigate to Project settings by clicking on the cog button. Select the Service accounts tab. Click on the X service accounts button as shown on the screenshot.

This will lead you to the Google Cloud Platform. In step 1, fill in the Service account details and click Create. The name of the service account will allow you to identify it among other service accounts you may have created.
In step 2, click the Select a role dropdown menu and choose the role. Note that Editor role is required for Firebase Test Lab and Firebase App Distribution Admin for Firebase App Distribution.
In step 3, you can leave the fields blank and click Done.
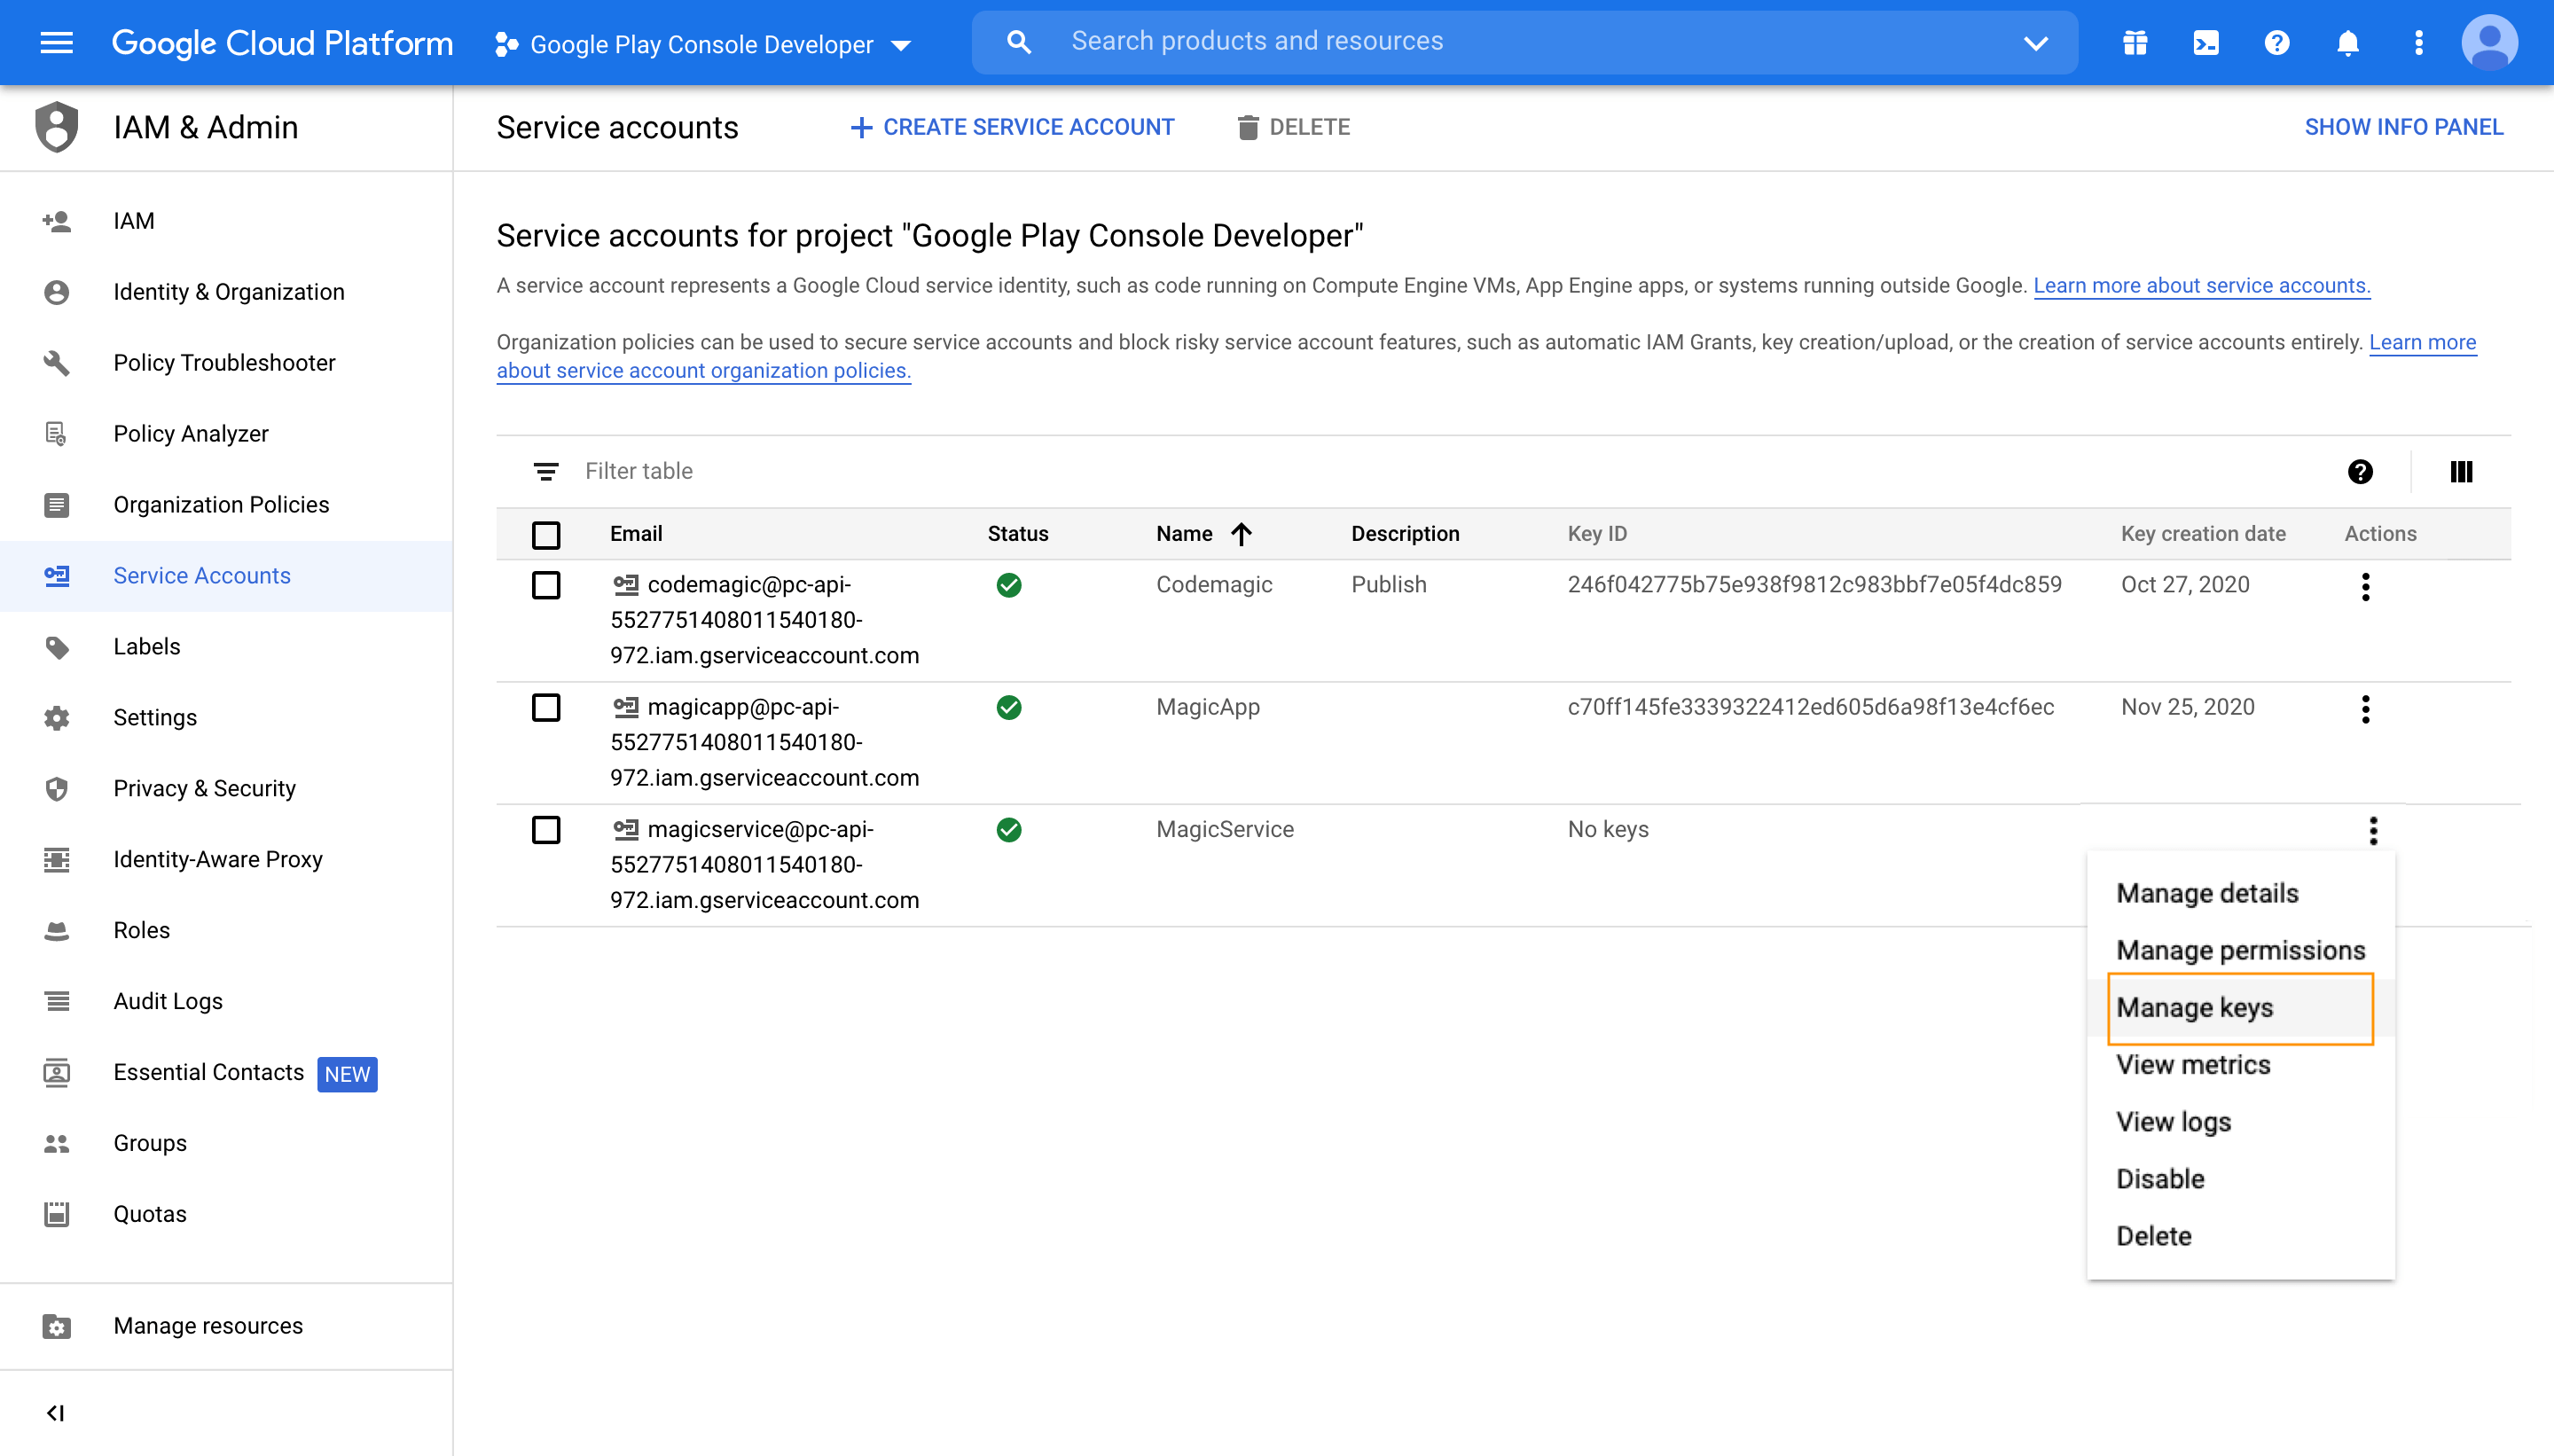
In the list of created service accounts, identify the account you have just created and click on the menu in the Actions column, then click Manage keys.

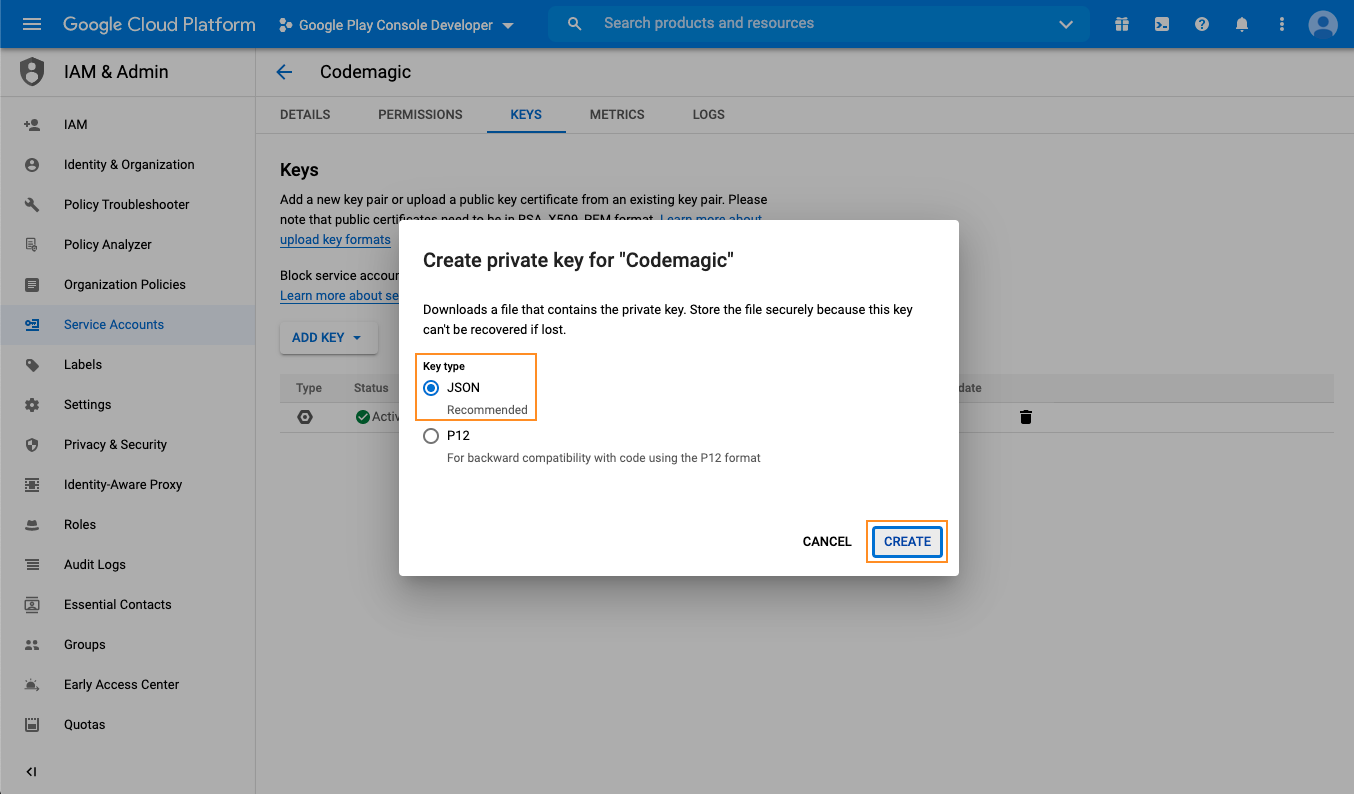
In the Keys section, click Add Key > Create new key. Make sure that the key type is set to
JSONand click Create. Save the key file in a secure location to have it available.
Configure variables in codemagic.yaml:
- Open your Codemagic app settings, and go to the Environment variables tab.
- Enter the desired Variable name, e.g.
FIREBASE_SERVICE_ACCOUNT. - Copy and paste the content of the service account JSON file as Variable value.
- Enter the variable group name, e.g. firebase_credentials. Click the button to create the group.
- Make sure the Secret option is selected.
- Click the Add button to add the variable.
- Repeat the steps to add a variable named
GOOGLE_APPLICATION_CREDENTIALSand set its value to a path where the credentials file will be placed during build. Suggested value is “$CM_BUILD_DIR/firebase_credentials.json”
Add variables in your
codemagic.yamlenvironment: groups: - firebase_credentials
2. Authenticating via token
firebase tool. Please authenticate using a service account, as described below.To retrieve your Firebase token, follow the instructions in Firebase documentation.
- Open your Codemagic app settings, and go to the Environment variables tab.
- Enter the desired Variable name, e.g.
FIREBASE_TOKEN. - Enter the token value as Variable value.
- Enter the variable group name, e.g. firebase_credentials. Click the button to create the group.
- Make sure the Secret option is selected.
- Click the Add button to add the variable.
Distribution to Firebase
Example configuration for publishing Android and iOS artifacts to Firebase:
publishing:
  firebase:
    # use this line to authenticate via service account
    firebase_service_account: $FIREBASE_SERVICE_ACCOUNT

    # or this line to authenticate via token:
    # firebase_token: $FIREBASE_TOKEN

    android:
      # Add your Android app id retrieved from Firebase console
      app_id: x:xxxxxxxxxxxx:android:xxxxxxxxxxxxxxxxxxxxxx

      # Add one or more groups that you wish to distribute your Android application to.
      # You can create groups in the Firebase console
      groups:
        - androidTesters
        - ...

    ios:
      # Add your iOS app id retrieved from Firebase console
      app_id: x:xxxxxxxxxxxx:ios:xxxxxxxxxxxxxxxxxxxxxx

      # Add one or more groups that you wish to distribute your iOS application to.
      # You can create groups in the Firebase console
      groups:
        - iosTesters
        - ...
If you wish to pass release notes with your build, create a release_notes.txt file and add it to the project working directory, which is either the repository root directory or the Project path specified in the Build section in your workflow settings. Codemagic will fetch the content of that file and publish it with the build.
In order to distribute an .aab to testers via Firebase App Distribution, your Firebase project must be linked to your Google Play account. More information is available here
Publishing only the Android app bundle or APK artifact to Firebase App Distribution
If you are building both an Android app bundle and an APK in your workflow, Codemagic will, by default, try to publish the bundle to Firebase App Distribution. If you wish to publish the APK, specify the artifact type as apk using the artifact_type field.
publishing:
  firebase:
    firebase_service_account: $FIREBASE_SERVICE_ACCOUNT
    android:
      app_id: x:xxxxxxxxxxxx:android:xxxxxxxxxxxxxxxxxxxxxx
      groups:
        - androidTesters
        - ...
      artifact_type: 'apk' # Replace with 'aab' to only publish the Android app bundle
Publishing to Firebase App Distribution with Fastlane
Before running a lane, you should install Fastlane Firebase app distribution plugin.
- name: Install fastlane-plugin-firebase_app_distribution
  script: |
    gem install bundler
    sudo gem install fastlane-plugin-firebase_app_distribution --user-install
Then you need to call a lane. This code is similar for Android and iOS.
- name: Execute fastlane android publishing task
  script: |
    cd android
    bundle install
    bundle exec fastlane <your_android_lane>
- name: Execute fastlane ios publishing task
script: |
cd ios
bundle install
bundle exec fastlane <your_ios_lane>Publishing an Android app to Firebase App Distribution with Gradle
Make sure you have added the FIREBASE_SERVICE_ACCOUNT and GOOGLE_APPLICATION_CREDENTIALS variables as described above.
- Specify the filepath in your
build.gradlefile underfirebaseAppDistributionsection asserviceCredentialsFile="your/file/path.json". If you followed this guide, the path is already saved inGOOGLE_APPLICATION_CREDENTIALSvariable
buildTypes {
    ...
    release {
        ...
        firebaseAppDistribution {
            ...
            serviceCredentialsFile=System.getenv('GOOGLE_APPLICATION_CREDENTIALS')
        }
}- In your root-level (project-level) Gradle file (usually android/build.gradle), add the App Distribution Gradle plugin as a buildscript dependency:
buildscript {
  repositories {
    // Make sure that you have the following two repositories
    google()  // Google's Maven repository
    mavenCentral()  // Maven Central repository
  }

  dependencies {
      ...
      classpath("com.android.tools.build:gradle:7.2.0")

      // Make sure that you have the Google services Gradle plugin dependency
      classpath("com.google.gms:google-services:4.3.15")

      // Add the dependency for the App Distribution Gradle plugin
      classpath("com.google.firebase:firebase-appdistribution-gradle:4.0.0")
  }
}- In your module (app-level) Gradle file (usually android/app/build.gradle), add the App Distribution Gradle plugin, and make sure is located below com.android.application plugin because the sequence of applying plugin matters:
apply plugin: 'com.android.application'
apply plugin: 'com.google.firebase.appdistribution'- Decode application credentials for Firebase authorization:
scripts:
  -name: Decode Google credentials
   script: |
echo $FIREBASE_SERVICE_ACCOUNT > $GOOGLE_APPLICATION_CREDENTIALS- Build the application:
scripts:
  -name: Build the app
   script: |
     echo "flutter.sdk=$HOME/programs/flutter" > "$CM_BUILD_DIR/android/local.properties"
     flutter packages pub get
flutter build apk --release- Call the gradlew task for distribution
scripts:
  -name: Distribute app to firebase with gradle plugin
   script: |
     cd android && ./gradlew appDistributionUploadRelease