iOS code signing
How to set up iOS code signing in the Flutter workflow editor
Code signing is required by Apple for integrating app services, installing your iOS app on real devices, and for uploading it to App Store Connect so that it can be distributed through TestFlight or App Store. It enables you to identify who developed the app and ensure that all the changes to the app come from you or your team.
To receive a signed .ipa file of your app on Codemagic, you need to set up code signing.
Introduction
Before you can start signing or distributing your app, you must have an Apple Developer Program membership.
The signing certificates — development or distribution — help to identify who built the code.
A provisioning profile — development or distribution — contains information about the app ID, the devices on which the app can be installed and the certificates that can be used for signing the app. Note that if your app contains app extensions, you need an additional provisioning profile for each app extension.
Note: With automatic code signing, Codemagic will create both the certificate and the provisioning profile on your behalf without requiring a Mac.
With manual code signing, you need to upload the signing files manually.
For successful signing, the certificate and the provisioning profile must match in the following way:
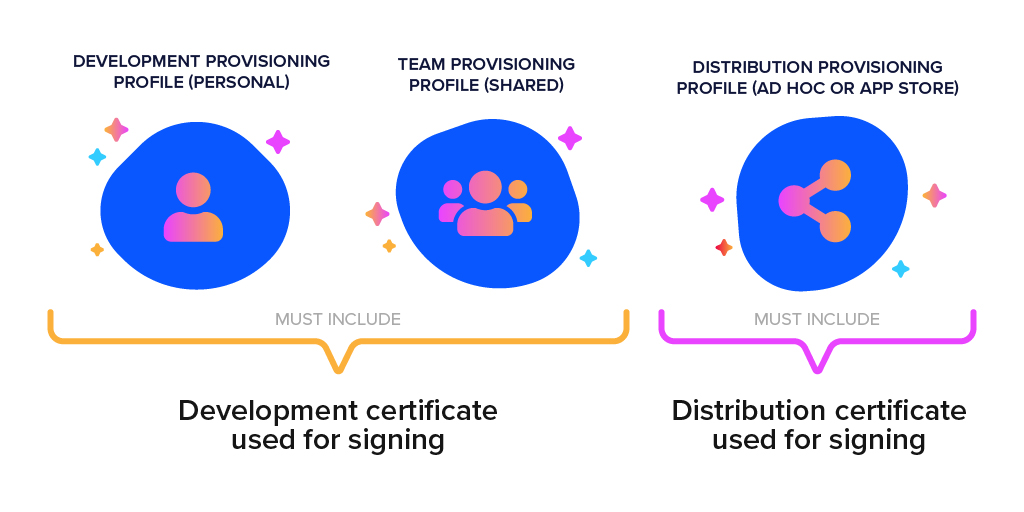
In short, the purpose of the different provisioning profiles is the following:
- Development: for testing the app on a real device while developing.
- Ad Hoc: for distributing the app to non-TestFlight testers. The app must be built in release mode.
- App Store: for distributing the app via TestFlight or the App Store. The app must be built in release mode.
Automatic code signing
Codemagic makes automatic code signing possible by connecting to App Store Connect via its API for creating and managing your code signing certificates and provisioning profiles. It is possible to set up several code signing identities and use different code signing settings per workflow.
The following sections describe how to set up automatic code signing for builds configured in the UI. If you’re building with codemagic.yaml, please refer here.
Step 1. Creating an App Store API key for Codemagic
It is recommended to create a dedicated App Store Connect API key for Codemagic in App Store Connect. To do so:
- Log in to App Store Connect and navigate to Users and Access > Integrations » App Store Connect API.
- Click on the + sign to generate a new API key.
- Enter the name for the key and select an access level. We recommend choosing
App Manageraccess rights, read more about Apple Developer Program role permissions here. - Click Generate.
- As soon as the key is generated, you can see it added to the list of active keys. Click Download API Key to save the private key for later. Note that the key can only be downloaded once.
Step 2. Connecting the Apple Developer Portal integration for your team/account
The Apple Developer Portal integration can be enabled in the Team integrations section in your team settings (if you’re a team admin). This allows you to conveniently use the same access credentials for automatic code signing and publishing across different apps and workflows.
- In the list of available integrations, click the Connect button for Developer Portal.
- In the App Store Connect API key name, provide a name for the key you are going to set up the integration with. This is for identifying the key in Codemagic.
- Enter the Issuer ID related to your Apple Developer account. You can find it above the table of active keys on the Integrations tab of the Users and Access page.
- Enter the Key ID of the key to be used for code signing.
- In the API key field, upload the private API key downloaded from App Store Connect.
- Click Save to finish the setup.
If you work with multiple Apple Developer teams, you can add additional keys by clicking Add another key right after adding the first key and repeating the steps described above. You can delete existing keys or add new ones when you click Manage keys next to the Developer Portal integration in personal account or team settings.
Step 3. Enabling automatic code signing for workflow
Once the Apple Developer Portal has been enabled for the account or team the app belongs to, you can easily enable automatic code signing per workflow.
- Go to App settings > Distribution > iOS code signing.
- Select Automatic as the code signing method. If you haven’t enabled the Apple Developer Portal integration yet, you will be asked to enable it before you can continue configuration.
- If you have several keys available, select the right key in the App Store Connect API key field.
- Select the provisioning profile type used for provisioning the build. Codemagic will automatically select or generate a matching certificate for code signing. The provisioning profiles (except for Distribution) will include all the devices you have registered on your Apple Developer account at the time of creating the profile.
- Select your app’s bundle identifier. Codemagic lists all the bundle IDs available for the selected App Store Connect API key. If you can’t see your app’s bundle identifier listed, create one in Apple Developer Portal.
com.example.app, the matching profiles are the ones with com.example.app and com.example.app.* as bundle identifier.As the next step, you can configure publishing to App Store Connect to distribute the app via TestFlight or submit it to the App Store.
Manual code signing
With the manual code signing method, you are required to upload the signing certificate and the matching provisioning profile(s) to Codemagic in order to receive signed builds. This is required when distributing your app via Apple Developer Enterprise Program or Apple Business Manager.
See how to export certificates and provisioning profiles.
Setting up manual code signing
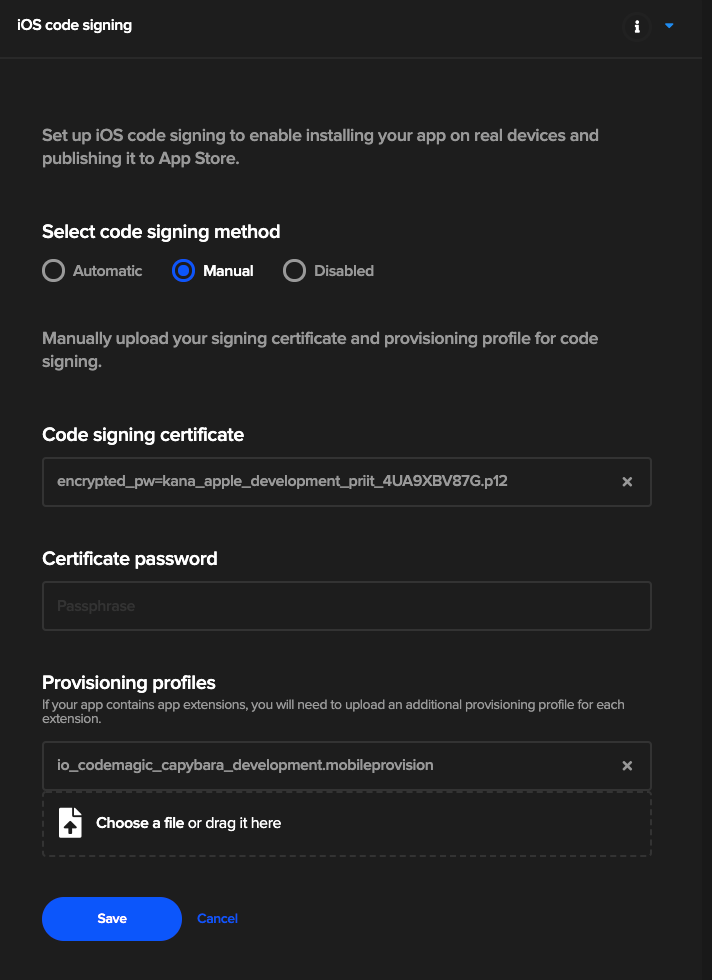
- Go to App settings > Distribution > iOS code signing.
- Select Manual as the code signing method.
- Upload your signing certificate (in
.p12format). If your certificate is password-protected, enter the Certificate password. - Upload your provisioning profile (
.mobileprovision). Note that if your app contains app extensions, you are required to upload an additional provisioning profile for each extension.
Codemagic will now create a signed .ipa file with every build. Note that you must also set up publishing to App Store Connect to distribute the app via TestFlight or submit it to the App Store.
Exporting certificates and provisioning profiles
If you don’t have an existing certificate, you will have to first generate the signing certificate using Xcode.
To export the signing certificate:
- Open Keychain Access by searching for it in Spotlight.
- Select My Certificates in the Category submenu on the left sidebar.
- Locate your certificate. The name of the certificate should start with iPhone Developer or iPhone Distribution.
- Click on the certificate and select File > Export Items from the OSX menu bar.
- You are then prompted to save the certificate. Be sure to leave the file format field filled as
Personal Information Exchange (.p12)because saving the certificate with the.cerextension will not include your private key. - Enter the certificate export password when prompted (optional).
To export the provisioning profile:
- Log in to the Apple Developer portal.
- Navigate to Certificates, Identifiers & Profiles > Profiles.
- Select the provisioning profile you would like to export and click Download.
- Save it to have it ready.
Additional information
More information about iOS code signing is available here.